In our previous post Anatomy of a feature file, we talked about the feature files, the Gherkin syntax, and Gherkin keywords. In this post, we will see a quick overview of Intuit Karate based on Gherkin.
Karate DSL uses Gherkin syntax, If you’re new to Cucumber & Gherkin, I highly recommend reading the previous post to understand terminologies.
Why Karate
Cucumber, the flagship BDD framework, popularized the programming language-neutral, behavioral test constructs, written in human languages using Gherkin.
The human-language test steps mentioned in the feature file are backed by programming-language-dependent Step-Definition files, that are processed by the Cucumber engine.
In today's world, development teams often work on Headless systems, which are comprised of only the backend APIs. The Gherkin steps to test such systems are fixed. Such as but not limited to.
- Set API
URL - Set request
HEADER - Append request
PATH - Set request
PARAM - Set HTTP methods
GET, POST, PUT, etc - Read/verify
RESPONSE
A skilled development team can write the step definitions for all these steps in any programming language, but that will not be the best use of their time. This is where Karate comes into the picture.
What is Karate
Karate is an open-source framework for API Test Automation (and more) having support for HTTP, JSON, GraphQL, and XML. It also provides many step definitions needed for API testing. And has built-in HTML reports, and the ability to run tests in parallel.
Karate itself is written in Java, but it can be used without any prior knowledge of Java. However, in the beginning, we do require a one-time effort to set up Maven or Gradle builds and Karate java test class.
As long as you know how to run commands on the terminal and edit files, you can use the below steps and start working on Karate.
After this initial setup, all you need to know is your APIs and Gherkin Syntax with Karate DSL
Basic Karate Project setup
In this post, we will create a bare minimum configured Karate Project to test the Google website. Here are the steps.
1. Create a simple maven project
It's not mandatory, but to keep life simple we require a Gradle or Maven project, so we can manage dependencies and trigger Karate with one command or click. I’m going to use Maven for our example here.
Do not worry if you do not understand these terms, just use the following command on the terminal.
OR
If you know how to create a maven project using your IDE, skip the command and create a maven project the way you like.
mvn archetype:generate \
-DarchetypeGroupId=org.apache.maven.archetypes \
-DarchetypeArtifactId=maven-archetype-simple \
-DarchetypeVersion=1.4 \
-DgroupId=com.mps.examples \
-DartifactId=simple-karate-example \
-Dversion=1.0-SNAPSHOT
2. Fix autogenerated maven project
The above command generates a folder named simple-karate-examplecontaining many files. But the maven-archetype-simple is outdated, so we need to make some changes to autogenerated files.
2.1. Update project Java version
I’m not sure why the maven archetype still points to java 1.7. So we will manually change it to use java 1.8
Open the pom.xml file, it should be right under the simple-karate-examplefolder. Look for maven.compiler.source & maven.compiler.targe and Let's make sure we do not have 1.7 mentioned here, if so, update it with 1.8. Finally, it should look as below.
<maven.compiler.source>1.8</maven.compiler.source>
<maven.compiler.target>1.8</maven.compiler.target>
2.2. Update the surefire plugin
If you’ve read my series on Maven, you might know maven build lifecycle is based on phases, that are comprised of goals, that are executed by maven plugins. One such plugin is surefire, which is used in the test phase. We need a minimum 2.22.1 surefire version to support this Karate example.
It's ok if you don't understand the above, just look for the <plugins> </plugin>tags in the autogenerated pom.xml and delete everything between these tags. Then add the below lines
<plugins>
  <plugin>
    <groupId>org.apache.maven.plugins</groupId>
    <artifactId>maven-surefire-plugin</artifactId>.
    <version>2.22.1</version>
    <configuration>
      <argLine>-Dfile.encoding=UTF-8</argLine>
    </configuration>
  </plugin>
</plugins>
2.3: update test resources
Karate tests are written in feature files, that are not Java files. Maven expects non-java test files to be placed under the resources folder. But for code maintainability, I want to keep feature files next to the Java test file.
For maven to pick up our feature files, add the following between the <build></build> tags.
<testResources>
  <testResource>
    <directory>src/test/java</directory>
    <excludes>
      <exclude>**/*.java</exclude>
    </excludes>
  </testResource>
</testResources>
2.4 Remove Old Junit dependency
As I said above, due to the outdated archetype, on the day of writing this blog, the autogenerated POM.xml comes with an old Junit dependency. We need to remove this dependency.
Search for <dependencies> </dependencies> tags in pom.xml file. Delete the Junitdependency present between the <dependencies> tags.
The correct Junit version will come as a transitive dependency, once we add Karate in the next step,
3. Add code to Trigger Karate
The command in step 1 created a basic maven project. Now let's introduce Karate to our project.
3.1 Add Karate dependency
Add karate by pasting the below lines inside the dependencies tag.
<dependency>
    <groupId>com.intuit.karate</groupId>
    <artifactId>karate-junit5</artifactId>
    <version>1.2.0</version>
    <scope>test</scope>
</dependency>
3.2 Edit Java Test file to trigger Karate
The command used in step 1 created the below folder structure,
As we are building a test suite, we are interested only in the AppTest.java file. We can delete the site & main folder
├── pom.xml
└── src
    ├── main
    │ └── java
    │     └── com
    │         └── mps
    │             └── examples
    │                 └── App.java
    ├── site
    │ └── site.xml
    └── test
        └── java
            └── com
                └── mps
                    └── examples
                        └── AppTest.java
The AppTest.java file refers to the old Junit versions which we‘ve removed from pom.xml. Let's delete everything in this file until you see it as below.
package com.mps.examples;

public class AppTest {

}
When we run a maven build, the maven test phase looks for all Java files inside the
testfolder and its subfolders, which are ending with the word”Test". And execute the methods annotated with theTestannotation.
We can add a test in our AppTest.java. to trigger the Karate test suite upon a maven build. Copy the below lines in AppTest.java.
@Test
void triggerKarate() {
    com.intuit.karate.Results results =
            com.intuit.karate.Runner
                    .builder()
                    .relativeTo(getClass())
                    .parallel(2);    org.junit.jupiter.api.Assertions.assertEquals
              (0, results.getFailCount(),
               results.getErrorMessages());
}
When we execute the command mvn clean test inside the simple-karate-example folder, this test runs and due to .relativeTo(getClass()), karate looks for any .feature file in the same folder or subfolder as AppTest class and executes it.
This is all that is mandatory for the basic setup.
4. Create a Krate test feature File
I assume you either already work with Gherkin syntax or have read my previous posts in this series. Because Gherkin & JSON are the only things that we need to know for writing simple karate tests.
Let's write a feature to test if Google is working or not. Let's create a new file in the same folder as AppTest.java I named it google.feature but you can name it anything as long as the name ends with the .feature extension,
Let's add the below content to the file
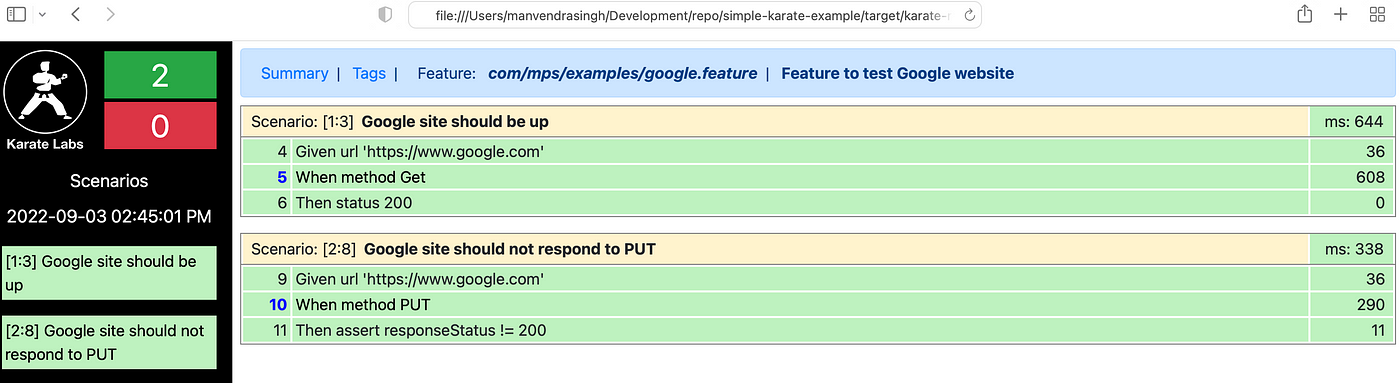
Feature: Feature to test the Google website

  Scenario: Google site should be up
    Given url 'https://www.google.com'
    When method Get
    Then status 200

  Scenario: Google site should not respond to PUT
    Given url 'https://www.google.com'
    When method PUT
    Then assert responseStatus != 200
5. Run the Karate Suite
Now with the magic of maven, all we need is, to run the mvn clean testcommand
Karate will execute all the feature files and will generate a fancy report for us. You can find the report path at the end of the build output.


Some optional Steps
Below are a few optional steps that can be used to set up a Karate test suite
1. Setup logging
You can skip this step and Karate will use default settings.
Karate uses Logback to perform logging during test execution. Logback can be configured using logback-test.xml or logback.xml in src/test and src/main respectively.
In absence of these files, Karate will use the default settings, which will print a lot more data than you might be interested in.
So for our bare minimum setup, let’s create a file named logback-test.xml insidesimple-karate-example/src/test/java and paste the below content.
This will make sure only relevant information is logged on the terminal.
<?xml version="1.0" encoding="UTF-8"?>
<configuration>   <appender name="STDOUT"
           class="ch.qos.logback.core.ConsoleAppender">
       <encoder>
          <pattern>
            %d{HH:mm:ss.SSS} %-5level %logger{36} - %msg%n
          </pattern>
      </encoder>
  </appender>  <logger name="com.intuit.karate"
         level="INFO">
       <appender-ref ref="STDOUT" />
  </logger>
</configuration>
2. Configuring Karate
You can skip this step if there is nothing to configure.
Karate can be configured by providing a file named karate-config.js in the classpath.
This file must contain a javascript function that returns a JSON object.
All the properties in this JSON object are made available to each feature file during test execution.
For a simple demo, let's create a file karate-config.js inside simple-karate-example/src/test/java and paste the below content.
function fn() {

  var config = {
     name: {
        first: 'Manvendra',
        middle: 'Pratap',
        last: 'Singh',
     }
  };
  return config;
}
This is how we are making my name available to all Feature-Files and scenarios in Karate. Now you can access this variable name in any of the feature files, let's add this background step at the top of our feature file google.feature
Background:
  * print name.first
Now when you run the mvn clean test command inside the simple-karate-example folder, you will see my first name is printed in logs.
This file also has access to
ScenarioBridgeclass as a javascript variable namedkarate.
You can use this variable to configure/execute various available methods inScenarioBrigebut more on this in a later post in this series.
This is all for a basic setup for the Karate API test suite. In the next post, we will dive a little deeper into best practices, configuration, and other quirks of writing a real-world full-fledged Karate suite for a microservice.
Stay tuned.
Comments