Installing & switching between multiple JDK on macOS

If you are not interested in any explanation, go to the very end of the post for commands. But I’ll recommend reading it.

A well-known process for installing any software on macOS is, either clicking an app icon or drag-and-drop the app icon into the Applications folder. This hides all installation details under the fancy app icons and an in-progress bar.

However, we developers like to see the logs and play with the command line tools. For this purpose, Linux Distros use package managers like yum or apt-get. But as with all things Apple, Most common free software don't work in macOS. This is where HomeBrew comes to the rescue

HomeBrew

As the tool's homepage says, it is

The Missing Package Manager for macOS. 
Homebrew is the easiest and most flexible way to install the UNIX tools Apple didn’t include with macOS.

With homebrew, we can install the software via the command line and can see a lot of installation information in the logs.

Installing Homebrew

To install Homebrew on macOS, Open either Terminal or iTerm application in macOS and run the below command.

/bin/bash -c “$(curl -fsSL https://raw.githubusercontent.com/Homebrew/install/HEAD/install.sh)"

After this completes, we can use homebrew to install available formulae or caskwith just one line commands brew install xxxx or brew install --cask xxxx

Installing various JDK versions

First, let's search Homebrew to find available java versions. Use the following command.

brew search --formulae java
As you can see below, only java11 and java are available.

Formulae name with no version prefix resolves to the Current GA version, at the time of writing this post, java formulae resolves to 17.0.2

If you want older versions, you can search with formulae openjdk.java and java11 are just alias for openjdk and openjdk@11

Now we know the formulae name, we can install different JDKs by one single command. Let's install current versions and java11.

Run the following 2 commands one after another, in Terminal or iTerm

brew install openjdk
brew install openjdk@11

Some manual settings

Now java 17 and java 11 both are installed on our mac. 
Let’s see which one will be used by Mac Programs.

  • On any machine, the easiest way to check the current java version is by 
    java -version
  • You can also check all installed java versions on macOS by java_home /usr/libexec/java_home -V

However, When I try the above 2 commands, I get this output

Somehow, macOS is not able to detect the java installed by Homebrew. This is because whenever you install a package with Homebrew

  1. It installs the package into the package's own directory
    Under /opt/homebrew/Cellar for M1-Mac 
    Under /usr/local/Cellar for Intel Mac
  2. It also creates a soft-link under /opt/homebrew/opt

But *nix systems search for java under /usr/bin/java/usr/lib/jvm/usr/local/bin/java. As with all things Apple, macOS is different, it searches for Java at /Library/Java/JavaVirtualMachines/

These JDK formulae could have set up the required softlink under folder /Library/Java/JavaVirtualMachines/. But by design, these JDK formulae are kept as keg-only

From Homebrew website

This information is also present in our install logs.
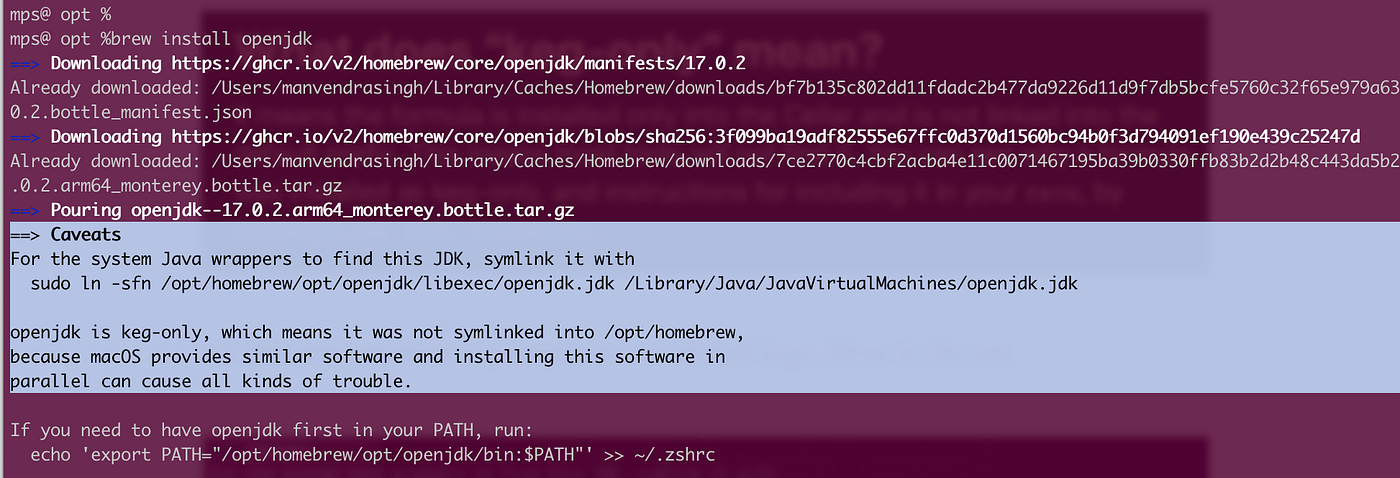
See highlighted text for Keg-only statement

So we need to create a few soft links in the mentioned folder if we want installed Java to be detected by all the Mac programs. Copy-paste the command given in install logs as is

Now if we try to run the failing command at the start of this section we see below the output

Now that we have 2 JDKs installed and detected by macOS, let's see how to quickly switch between the two.

If you are installing only one version of Java we are done. But, if you want many different versions of java on your Mac, you can install each of them as per the steps above & switch between them as per the steps below

Switching JDKs (JAVA_HOME & java_home)

JAVA_HOME is the environment variable that directs java programs to pick the Java location. So to switch between various java versions we need to change the JAVA_HOME value to different locations

We also have /usr/libexec/java_home utility which we will use to move between various versions.

For our installation, this is what parameter -v (small case v) gives us

  • We can leverage the output of this command to set JAVA_HOME as below,
    export JAVA_HOME=`/usr/libexec/java_home -v 17
  • But the command might be a little long to type, So let's create a one-word alias to replace the whole command. 
    alias java-17=”export JAVA_HOME=`/usr/libexec/java_home -v 17`”
  • We also need to make sure, every time we open a new terminal, these aliases are available. For that, we need to add them in ~/.zshrc file. Add following 2 aliases in ~/.zshrc file. Create ~/.zshrc if it doesn’t exist.
alias java-17=”export JAVA_HOME=`/usr/libexec/java_home -v 17`; java -version”
alias java-11=”export JAVA_HOME=`/usr/libexec/java_home -v 11`; java -version”

We are all done.
Just type java-11 or java-17 on your Terminal or iTerm whenever you want to change the java versions.

TL;DR (Quick summary of command)

For all those who just want the steps, not any explanation, here are the quick steps.

  • Install Homebrew if you do not have on your system
/bin/bash -c "$(curl -fsSL https://raw.githubusercontent.com/Homebrew/install/HEAD/install.sh)"
  • Install as many JDK as you want with Homebrew and openjdk
brew install openjdk@XX
  • Make JDK accessible for MAC, by adding either a soft link or real folders in 
    /Library/Java/JavaVirtualMachines/ . For Softline use below command
sudo ln -sfn /opt/homebrew/opt/openjdkXXX/libexec/openjdkXXX.jdk /Library/Java/JavaVirtualMachines/openjdkXXX.jdk
  • Add one more alias under ~/.zshrc to quickly switch between JDK
alias java-XX="export JAVA_HOME=`/usr/libexec/java_home -v XX`; java -version"

Comments

Popular posts from this blog

Unable to Redo in VS-Code & Intellij

Since the beginning of personal computers, few keyboard shortcuts are common among all operating systems and software. The ubiquitous cmd+c (copy), cmd+v(paste) , cmd+z (undo) and cmd+y (redo) I am not sure why, both of my favorite IDEs,  Visual Studio Code  &  Intellij  decided to not use  cmd+Y for redo.Below are the quick steps to configure  cmd+Y for a redo in VS-Code & Intellij Visual Studio Code Open VS Code & Go to keyboard shortcuts There will be a search bar at the top Type “  redo  “ in the search bar. You can see on my system its still mapped to  shift+cmd+z Double click on  ⇧ ⌘ z  and the below box will appear. Do not click anywhere or type anything on the keyboard except the key you want to assign, in our case it was  cmd+y,  so type  cmd+y Press Enter and you are done. Now you can use  cmd+z  for undo and  cmd+y  to redo like always Intellij It is also as simple as VS-Code...

My Custom Built Desktop. The Questions & The Answers!

If  you want to avoid overpriced pre-builts like the M1 Mac Mini, Mac Pro, or Dell XPS Desktop without compromising on performance, a self-built desktop is a preferred option. It's also a great choice if you enjoy building things. custom built with ASUS-PRIME-P If you choose to build a custom PC, be prepared to invest time in researching and assembling compatible components.  In this post, I'll share my experience building this colorful powerhouse. I'll cover: Why did I do it.  Key questions to ask when selecting components Thought process behind component choices Components used in my build Benchmark comparisons . ** My second custom-build **.  ***  Disclaimer: Not an Apple product. Just a free apple sticker is used *** Why did I do it I decided to get a desktop during the pre-MacM1 era (yes, that’s a thing). After browsing many websites, I found that well-configured prebuilt PCs were overpriced, while cheaper ones had subpar components. Unable to choose betwee...

An Introduction to Quartz Scheduler

It's a common use case to have an enterprise application, perform specific work, at a specific time or in response to a specific action. In other words, “There is an ask to execute a  Job  upon a predefined  Trigger ”. This brings us to the need for a  Scheduling System.  A system, where  Jobs  &  Trigger  can be registered and the system will manage the remaining complexity. Thankfully for the Java systems,  Quartz  is for rescue. It‘s an open-source library that has been extensively used in enterprise applications for more than a decade. Components in Quartz Sub System: Following are the all major component in the Quartz subsystem: Scheduler : It’s the control room of Quartz. It maintains everything required for scheduling,  such as managing listeners ,  scheduling jobs , clustering, transactions & job persistence. It maintains a registry of  JobDetails ,  Listeners  &  Triggers , and exec...

Time Zones, Meridian, Longitude, IDL… It's more politics than science.

Once, I was working on a few geospatial APIs handling many time zones. While writing tests, I realized I did not know much about timezones. A lame excuse might be, my subpar schooling as a village kid. Nevertheless, I decided to turn the pages on timezones, what I found was more politics than science. Photo by  Arpit Rastogi  on  Unsplash Before diving into anomalies, let’s talk about history then we will go to science followed by politics. History The world without time zones By 300 BCE, the western world agreed that the earth is round. Each developed civilization devised its unique distinct system to measure distances, times & absolute locations, but relative to prime locations within their civilizations. It all worked in ancient times because long-distance travel was not prevalent among common people. Only merchants or armies traveled long distances. And they already developed systems that worked on their predetermined routes, irrespective of the time differences b...

Maven (0) - Preface

During our java based microservice development, we extensively use build tools like  Maven or Gradle.  Usually, IDEs do a lot on our behalf or we just run some predefined commands without checking what's happening inside. Here in this series of 6 posts, I tried to explain Maven. Before I start talking about what Maven is, and its different components, let’s discuss the “why”. Why do we even need Maven?  For this, I’ve to first explain the nature of a Java-based project and also need to take you back in history. The “Build” Step. Java is a compilable language, Unlike Python or Javascript, which are interpreted. ie, the code we write in java, can not as-is run on a Java virtual machine (JVM). JVM understands only the bytecode. Therefore, in the Java world, there is always a need for an  intermediary step.  A step that compiles the java code files into bytecode. That's why after writing the java code, we “somehow” create some deployable (jar, war, ear) to run on ma...

BDD (1) — Behavior Driven Development

A wise man ( narcissist me ) once said, “Life is all about the question and answers. The trick to a meaningful life is,  To ask the right questions to yourself, so you can get on the right path to search for the answer .” The very first question one should always ask oneself is WHY.  Let's discuss our WHY in the current case. Why BDD Let's take a step back and start with the well-known software development practice TDD ( Test-Driven Development).  In TDD, the very first thing developers do is, set up the technical expectations from the code by writing failing test cases. After the expectation is set, the code is written/modified to finally pass all of the failing tests. It's an  Acceptance driven development strategy . TDD works fine to create a robust technically working product. But the whole TDD approach revolves only around technical teams. It barely involves the business analysis or product owners to validate the business aspect of a feature, they get involved o...